An agent that you set up and manage on your own to run Azure DevOps pipeline jobs.
Self-hosted agents give you more control to install dependent software needed for your builds and deployments.
- Sign up for Azure Pipelines
- Create Agent Pools
- Setup Pipeline for Self-hosted agents
- Auto-scaling Self-hosted agents using KEDA
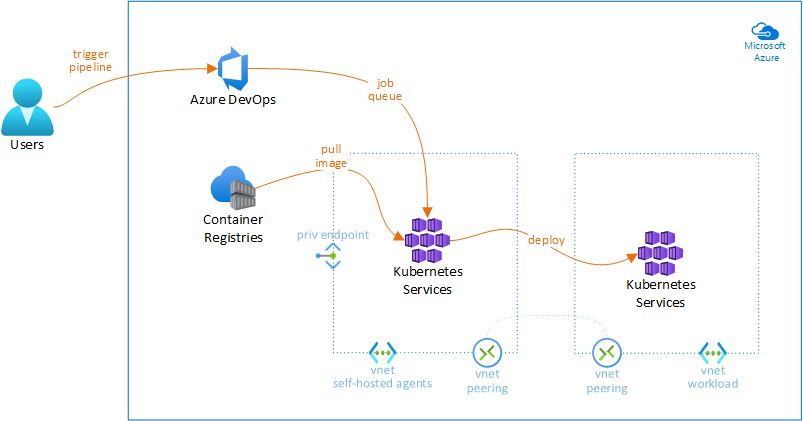
Desired architecture where Azure Kubernetes Service is hosting the Azure DevOps Self-hosted agents layer and Azure Kubernetes Service is hosting the infrastructure layer of the target company workload.
Sign up for Azure Pipelines
-
Log into Azure DevOps using your account.
Note: Sign up for an Azure DevOps organization to begin managing CI/CD to deploy your code.
-
Enter a name for your organization, select a host location from the drop-down menu, enter the characters you see, and then select Continue.
Note: Use https://dev.azure.com/{yourorganization} to sign in to your organization at any time.
-
Enter a name for your project, select the visibility, and optionally provide a description. Then choose Create project.
Create Agent Pools
An agent pool is a collection of agents.
Instead of managing each agent individually, you organize agents into agent pools.
When you configure an agent, it is registered with a single pool, and when you create a pipeline, you specify the pool in which the pipeline runs.
When you run the pipeline, it runs on an agent from that pool that meets the demands of the pipeline.
In Azure Pipelines, pools are scoped to the entire organization, so you can share the agent machines across projects.
This article describes how to Create the Azure DevOps Self-hosted Agent on different container platforms.
- Self-hosted agents on Azure Container Instances
- Self-hosted agents on Azure Kubernetes Service
- Self-hosted agents on Azure Container Apps
Self-hosted agents on Azure Container Instances
-
Go to your organization and select Organization settings.
-
Select Agent pools in the left panel under Pipelines.
-
Select Add pool.
-
Select Self-hosted for Pool type, type the name of your pool (e.g. ACI-pool) and select Create.
-
Deploy and configure Azure Container Registry, in case you don’t have one.
Note: Follow instructions from Quickstart: Create an Azure container registry. After this, ensure you are logged to the Container Registry, and then you can push and pull containers from Azure Container Registry.
-
Create in your machine a work directory of your choice and navigate into it.
-
Download files
Dockerfileandstart.shand save them in your work directory. -
Build the Azure Devops Self-hosted container based on your needs (tools, frameworks, etc) and push it into tour Container Registry repository.
Note: Replace
[your registry]by your Container Registry account and ensure you are logged to the Container registry.docker build -t [your registry]/adoagent:latest . docker push [your registry]/adoagent:latest -
Download file
azdevops-apps.ymland save it in your work directory.Note: Replace values on file
azdevops-apps.ymlwith your own values.Env Var Description AZP_TOKENPersonal Access Token (PAT) with Agent Pools (read, manage) scope, created by a user who has permission to configure agents, at AZP_URL. -
Deploy the ACI container.
Note: Ensure your Azure Resource Group is created. Replace
[resource group]with your own values.az container create \ --resource-group [your resource group] \ --file azdevops-apps.yml -
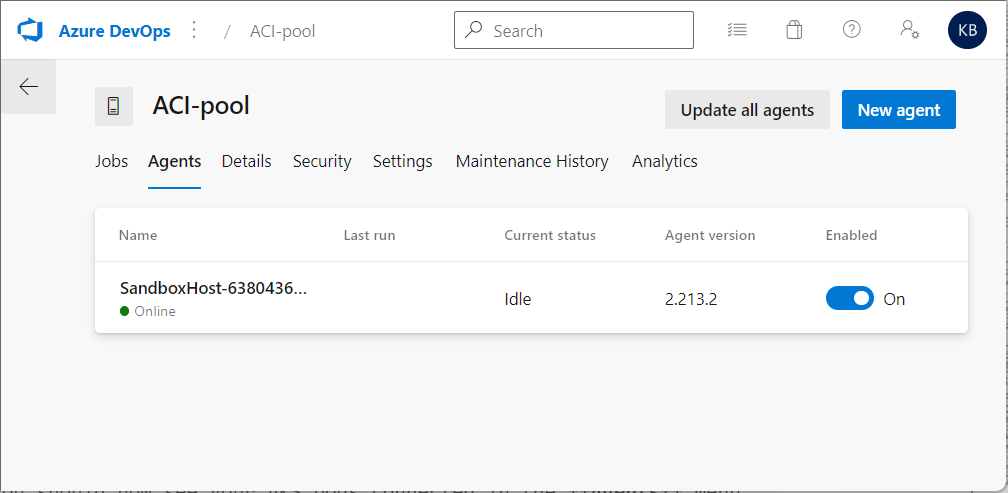
Go to your Organization settings, select Agent pools and select the related ACI agent pool.
-
You should now see your ACI container instance connected in the Agents menu.
Note: You can run multiple ACI container instances using Container Groups. See Tutorial: Deploy a multi-container group using Docker Compose for details.
Self-hosted agents on Azure Kubernetes Service
-
Go to your organization and select Organization settings.
-
Select Agent pools in the left panel under Pipelines.
-
Select Add pool.
-
Select Self-hosted for Pool type, type the name of your pool (e.g. AKS-pool) and select Create.
-
Deploy and configure Azure Container Registry, in case you don’t have one.
Note: Follow instructions from Quickstart: Create an Azure container registry. After this, ensure you are logged to the Container Registry, and then you can push and pull containers from Azure Container Registry.
-
Create in your machine a work directory of your choice and navigate into it.
-
Download files
Dockerfileandstart.shand save them in your work directory. -
Build the Azure Devops Self-hosted container based on your needs (tools, frameworks, etc) and push it into tour Container Registry repository.
Note: Replace
[your registry]by your Container Registry account and ensure you are logged to the Container registry.docker build -t [your registry]/adoagent:latest . docker push [your registry]/adoagent:latest -
Deploy and configure Azure Kubernetes Service (AKS).
Note: Setup the AKS cluster based on your needs. In a public subnet, in a private subnet, etc. There are multiple choices you can select. Ensure you have all requirements satisfied, or just create an AKS cluster based on the AKS Quickstart guide.
-
Download file
azdevops-apps.ymland save it in your work directory.Note: Replace values on file
azdevops-apps.ymlwith your own values.Env Var Description AZP_TOKENPersonal Access Token (PAT) with Agent Pools (read, manage) scope, created by a user who has permission to configure agents, at AZP_URL. -
Connect to your AKS cluster and deploy the manifest.
Note: Ensure your Azure Resource Group and AKS namespace are created. Replace
[your subscription id],[your resource group],[your AKS cluster]and[your namespace]with your own values.az account set --subscription [your subscription id] az aks get-credentials --resource-group [your resource group] --name [your AKS cluster] kubectl apply -f azdevops-apps.yml -n [your namespace] -
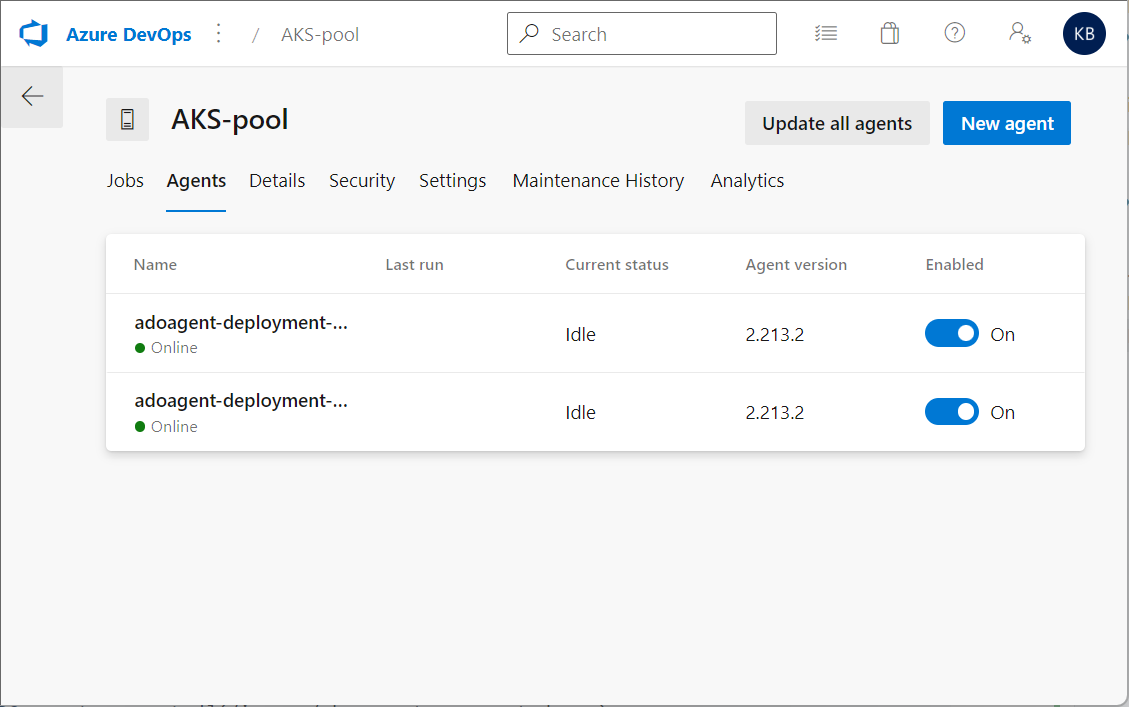
Go to your Organization settings, select Agent pools and select the related AKS agent pool.
-
You should now see your AKS pod instance connected in the Agents menu.
Note: You can run multiple pods as you want. In the picture there are 2 online as example only.
Self-hosted agents on Azure Container Apps
-
Go to your organization and select Organization settings.
-
Select Agent pools in the left panel under Pipelines.
-
Select Add pool.
-
Select Self-hosted for Pool type, type the name of your pool (e.g. ACA-pool) and select Create.
-
Deploy and configure Azure Container Registry, in case you don’t have one.
Note: Follow instructions from Quickstart: Create an Azure container registry. After this, ensure you are logged to the Container Registry, and then you can push and pull containers from Azure Container Registry.
-
Create in your machine a work directory of your choice and navigate into it.
-
Download files
Dockerfileandstart.shand save them in your work directory. -
Build the Azure Devops Self-hosted container based on your needs (tools, frameworks, etc) and push it into tour Container Registry repository.
Note: Replace
[your registry]by your Container Registry account and ensure you are logged to the Container registry.docker build -t [your registry]/adoagent:latest . docker push [your registry]/adoagent:latest -
Deploy your Azure Container Apps instance.
Note: Below a deployment example. Ensure your Azure Resource Group is created. Replace
[your ACA name],[your resource group],[your azure region],[your registry],[your ACA environment],[your registry user name],[your registry user password],[your personal access token],[your Azure organization]and[your Azure DevOps agent pool]with your own values. Follow the steps in Quickstart: Deploy an existing container image with the command line or check service docs for additional configuration options.az containerapp env create \ --name [your ACA environment] \ --resource-group [your resource group] \ --location [your azure region] az containerapp create \ --name [your ACA name] \ --resource-group [your resource group] \ --image [your registry]/adoagent:latest \ --environment [your ACA environment] \ --registry-server [your registry] \ --registry-username [your registry user name] \ --registry-password [your registry user password] \ --min-replicas 1 \ --max-replicas 5 \ --secrets 'azptoken=[your personal access token]' \ --env-vars \ 'AZP_URL=https://dev.azure.com/[your Azure organization]' \ 'AZP_TOKEN=secretref:azptoken' \ 'AZP_POOL=[your Azure DevOps agent pool]' -
Go to your Organization settings, select Agent pools and select the related ACA agent pool.
-
You should now see your Azure Container Apps containers connected in the Agents menu, as the example below.
Note: You can run multiple pods as you want. In the picture there are 2 online as example only.
Setup Pipeline for Self-hosted agents
-
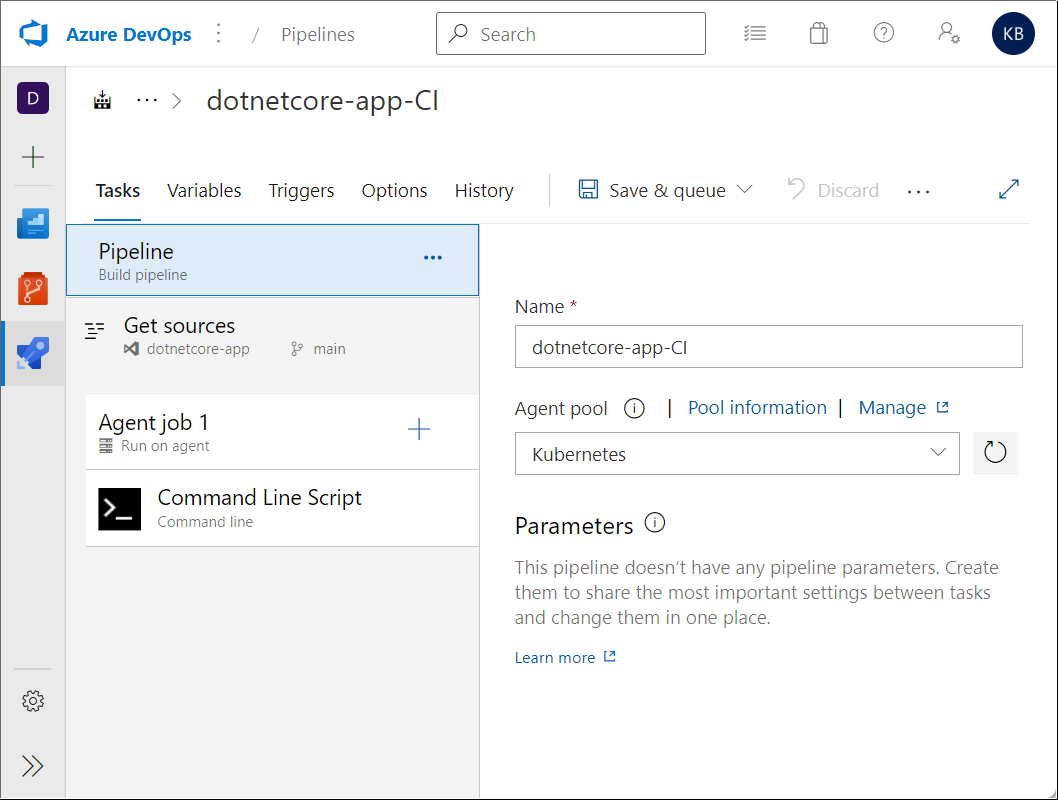
Go to your organization and select an existent project.
-
Select Pipelines in the left panel and then Create pipeline.
-
Select Use the classic editor to create a pipeline without YAML then Continue.
Note: In this article we are using the classic editor for exercise. You can select any other based on your real scenario. The next steps are based on the classic editor option.
-
Select Empty pipeline then Apply.
-
Select the Self-hosted agent pool previously created (e.g. Kubernetes), click the plus signal on Agent job 1 and select Command line.
-
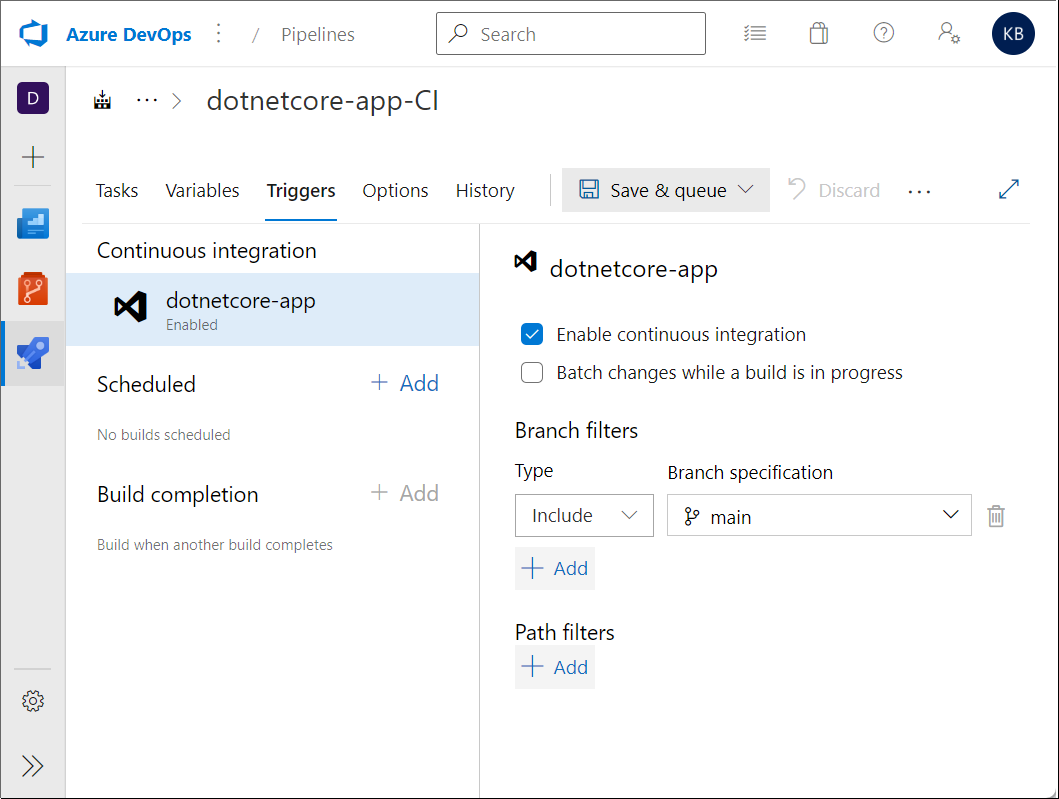
In the Triggers menu, select Enable continuous integration, then click Save & queue, type a comment and select Save and run.
-
The pipeline should complete and you receive an e-mail.
Auto-scaling Self-hosted agents using KEDA
With the addition of Azure Piplines support in KEDA, it is possible to autoscale your Self-hosted agents based on agent pool queue length.
In this section I am going to use KEDA to create Self-hosted scalable Azure DevOps agents deployed on different container services, like Azure Kubernetes Service (AKS), Azure Container Apps (ACA), etc.
- Auto-scaling Self-hosted agents on Azure Kubernetes Service with KEDA
- Auto-scaling Self-hosted agents on Azure Container Apps with KEDA
Auto-scaling Self-hosted agents on Azure Kubernetes Service with KEDA
-
Setup KEDA into your AKS cluster according to procedure Deploying KEDA.
Note: Self-hosted agents on AKS is required for this step.
-
Download manifest
azdevops-keda.ymland apply it to create the resource ScaledObject. It will enable KEDA to scale your Self-hosted agents.kubectl apply -f azdevops-keda.yml -n [your namespace] -
It’s now time to see autoscaling in action.
-
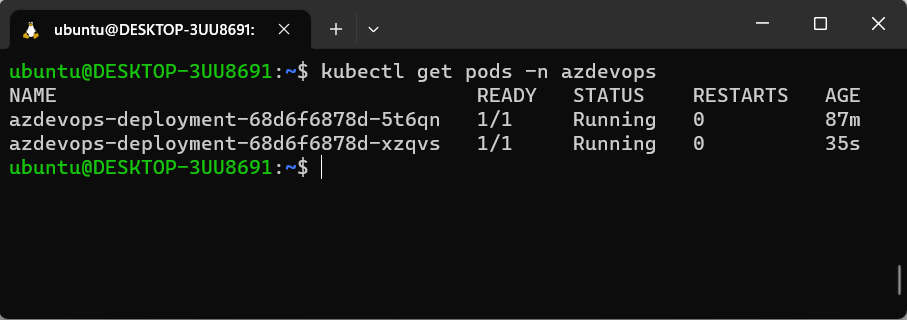
First, check the current pods running in the deployment. In my case I have only one.

-
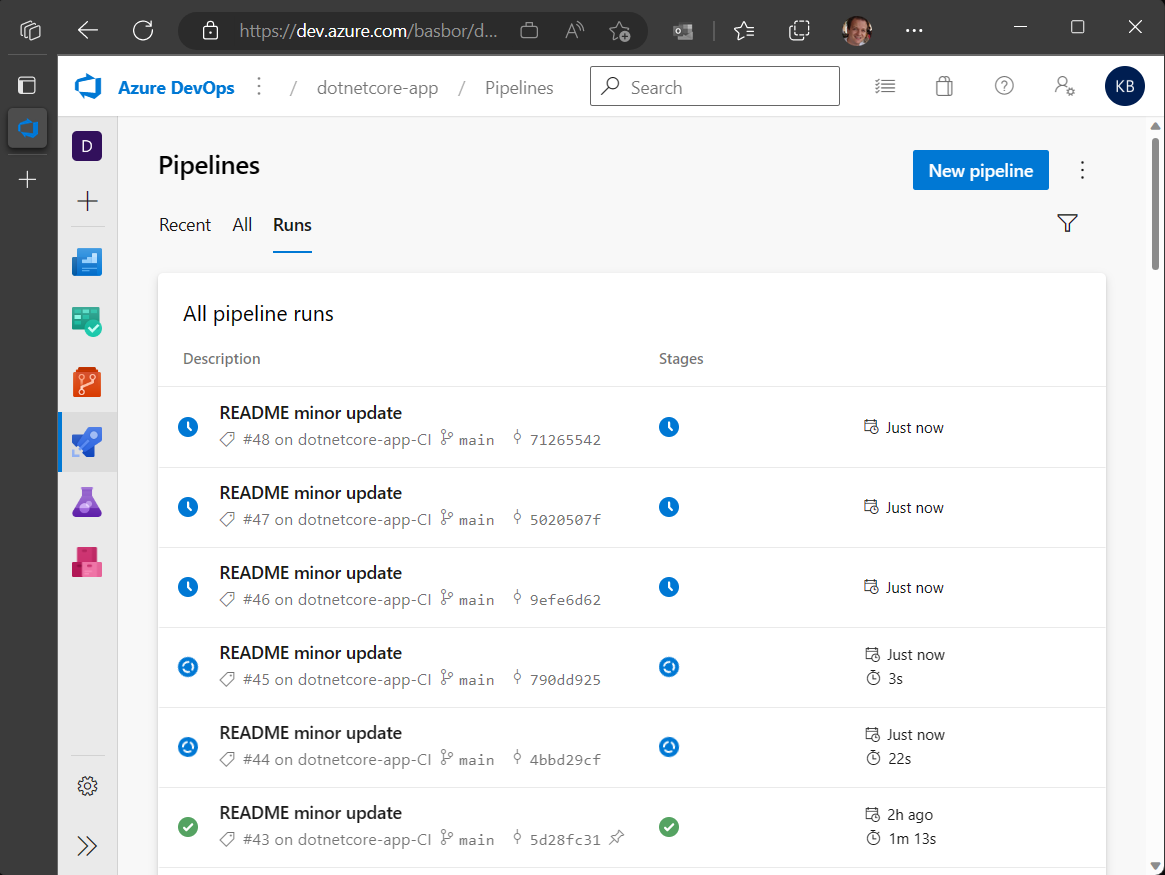
Now queue some Azure Pipeline builds and let´s them to be pending.
-
As a result, you see KEDA scaling out the pods to meet the pending jobs. In my case, as I have only 2 paralel jobs available, it scaled automatically to 2 pods.
-
Auto-scaling Self-hosted agents on Azure Container Apps with KEDA
-
Create in your machine a work directory of your choice and navigate into it.
-
Download files
azdevops-keda.ps1,azdevops-pool.ps1andaca-keda.jsonto your work directory.Note: Replace following variables on file
azdevops-keda.ps1with your own values:[your ACA name][your resource group][your azure region][your registry][your ACA environment][your registry user name][your registry user password][your personal access token][your Azure organization][your Azure DevOps agent pool]
-
Deploy your Azure Container Apps instance using Powershell.
azdevops-keda.ps1 -
It’s now time to see autoscaling in action.
-
First, check the current pods running in the deployment. Go to your Organization settings, select Agent pools and select the related ACA agent pool.
-
Now queue some Azure Pipeline builds and let´s them to be pending.
-
As a result, you see KEDA scaling out the pods to meet the pending jobs. In my case, as I have only 2 paralel jobs available, it scaled automatically to 2 pods.
-